Table of Contents
- Start With a Plan and a Sketch
- The Essential Elements of a Basement Bar
- A Counter and Bar Top
- Cabinets, Shelves, and Drawers
- Refrigeration
- A Sink With Running Water (Wet Bars)
- Build From Plans or Design Your Own
- How to Build a Basement Bar: Step by Step
- Codes, Permits, and Safety You Cannot Skip
- Choosing Barstools for Your Basement Bar
- Finishing Touches and Accessories
- Bringing Your DIY Basement Bar Together
- Frequently Asked Questions
A practical, budget-aware plan for designing, framing, and finishing a basement bar you build yourself.
Summary: Key Takeaways
- A DIY basement bar is achievable with basic carpentry, the right plan, and realistic expectations.
- Sketch your design first and decide between a dry bar and a wet bar before buying anything.
- Every bar needs a counter, storage, refrigeration, and, for a wet bar, a sink with running water.
- Wet-bar plumbing and new electrical circuits usually require permits and inspections.
- Match stool height to your counter: about 30-inch stools for a 42-inch bar.
- Finish with accessories that give the room personality without overspending.
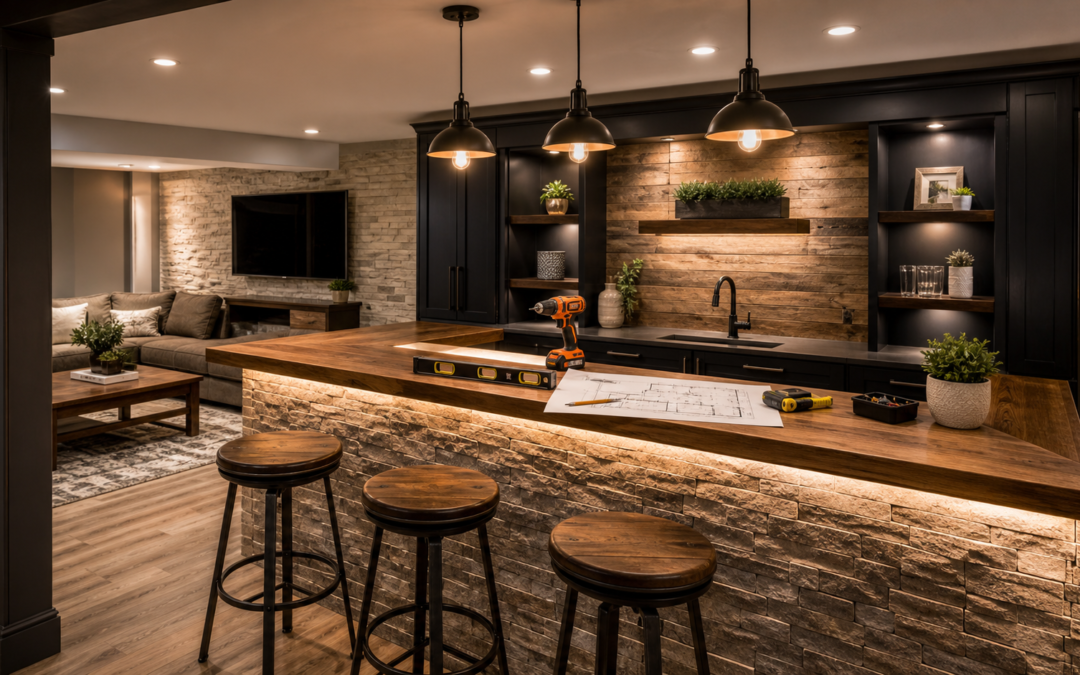
Having a bar at home is a goal for a lot of people, and the basement is one of the best places to put one. A DIY basement bar gives you a private spot to enjoy a drink with friends and family without going out, and building it yourself keeps the cost down. The project can be challenging if your carpentry skills are basic, but with a clear plan and a little patience it is well within reach.
This guide walks through the whole process — planning, essentials, build steps, codes, seating, and accessories — with a focus on the basement specifically. For broader inspiration and layouts, start with our main basement bar ideas guide, then come back here to build.
Start With a Plan and a Sketch
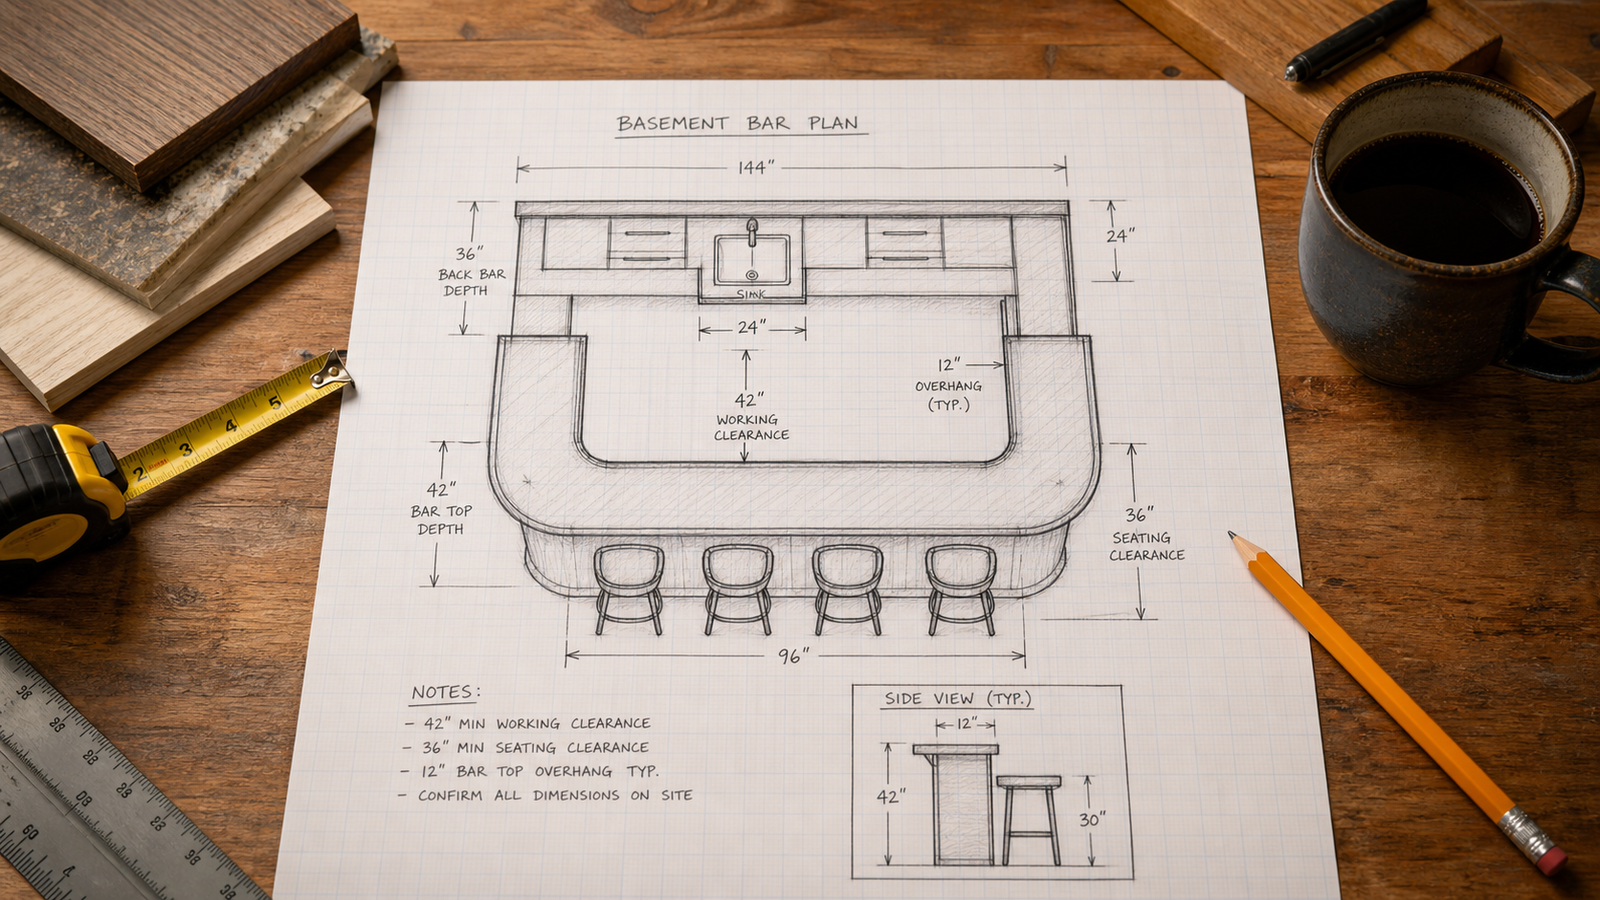
Before you build anything, picture how you want your basement bar to look. A simple drawing keeps you on track and helps you spot problems before they cost money. Note the dimensions of your space, where utilities run, and how people will move around the finished bar.
As you sketch, decide on a few fundamentals:
- Wet bar or dry bar: a wet bar adds a sink and plumbing; a dry bar skips it to save cost and effort.
- Size and shape: most home bars run 6 to 12 feet long; a straight wall bar suits a narrow basement, while L-shaped and U-shaped designs fit larger rooms.
- Seating count: plan about 24 inches of bar width per seated guest.
- Clearance: leave 36 to 42 inches behind the bar so you can work while guests are seated.
For help choosing a configuration, see our basement bar layout guide, and if you want a sink, read up first in our wet bar ideas and planning article.
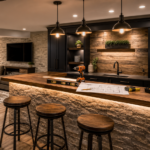
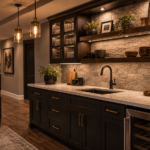
The Essential Elements of a Basement Bar
Every basement bar, simple or elaborate, is built around the same core elements. Plan for these before you add personality:
A Counter and Bar Top
The countertop is where you mix drinks and set out food, and it is the surface guests notice first. Bar tops should be waterproof and heat-resistant. Choosing the material is a decision worth its own guide, so see our basement bar cabinet and countertop ideas.
Cabinets, Shelves, and Drawers
You need accessible storage for glasses, bottles, and tools, with the most-used items within easy reach of the counter.
Refrigeration
A small under-counter refrigerator or refrigerated drawers keep drinks and mixers cold without a trip upstairs. Some built-in bars also include kegerator systems for draft beer.
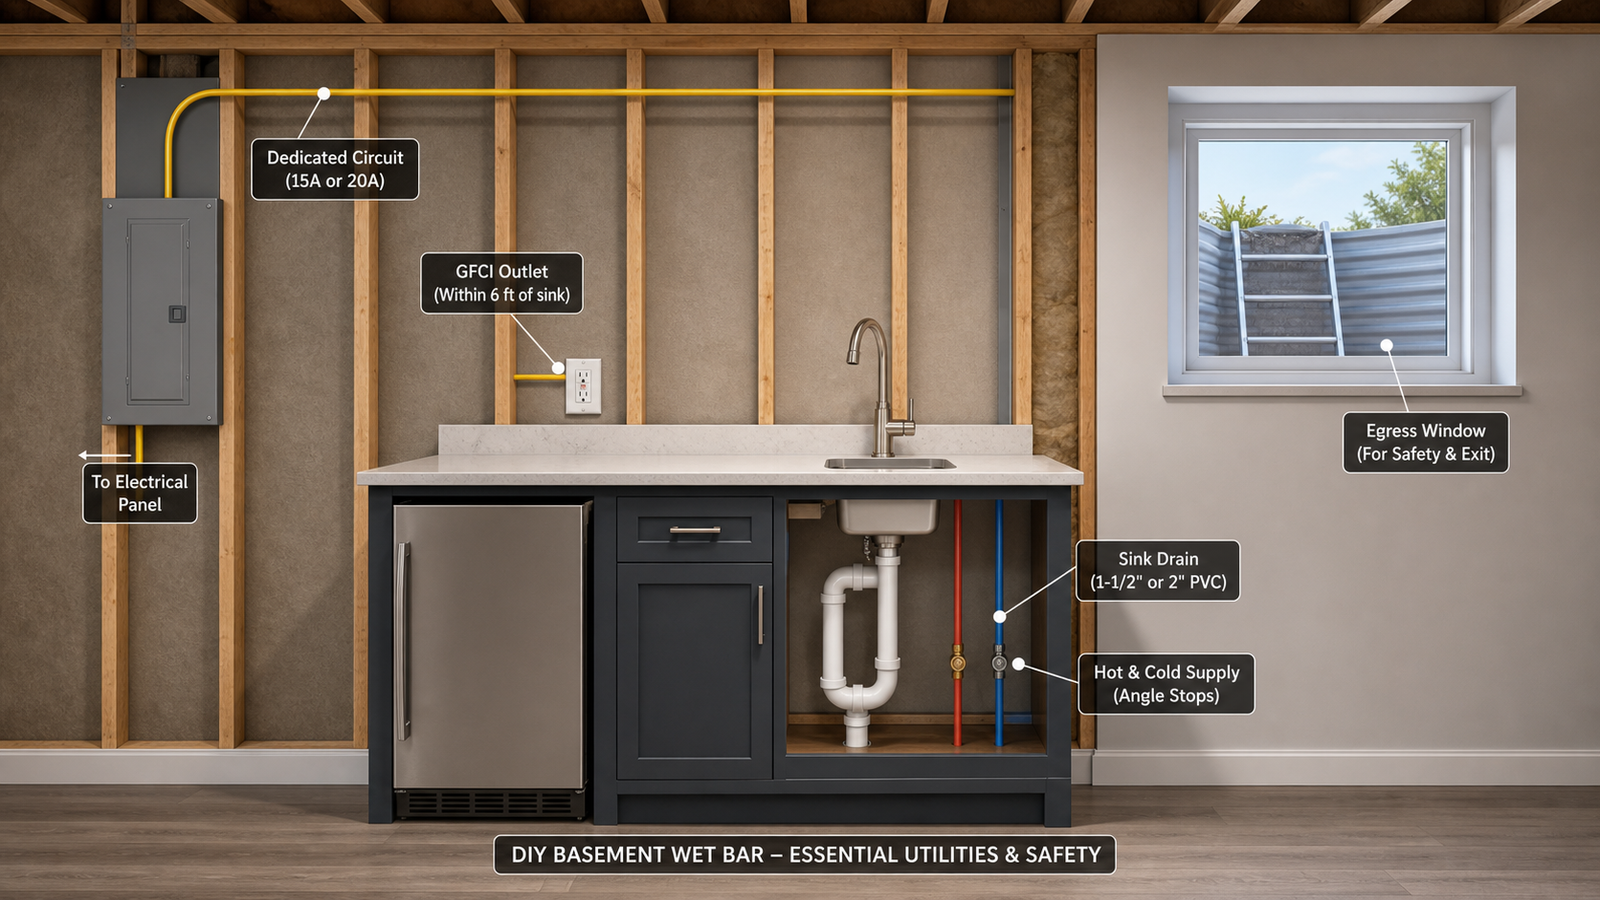
A Sink With Running Water (Wet Bars)
If you are building a wet bar, a sink makes mixing drinks and cleaning glassware far easier. This is the element that turns a simple build into a plumbing project, so plan supply lines, drainage, and a shut-off before you frame.

Build From Plans or Design Your Own
You do not have to start from a blank page. Pre-made home bar plans give you step-by-step instructions and a building-supply list, which is reassuring if your carpentry is rusty. Common build types include the straight wall bar, the L-shaped wet bar, a portable party bar, a kegger bar, and a bar back for bottle display. Most include cabinets, storage, and adjustable racks for bottles and glasses.
If you would rather design your own, our home bar design ideas and basement bar themes guides can help you settle on a look that blends with the rest of your home before you cut a single board.

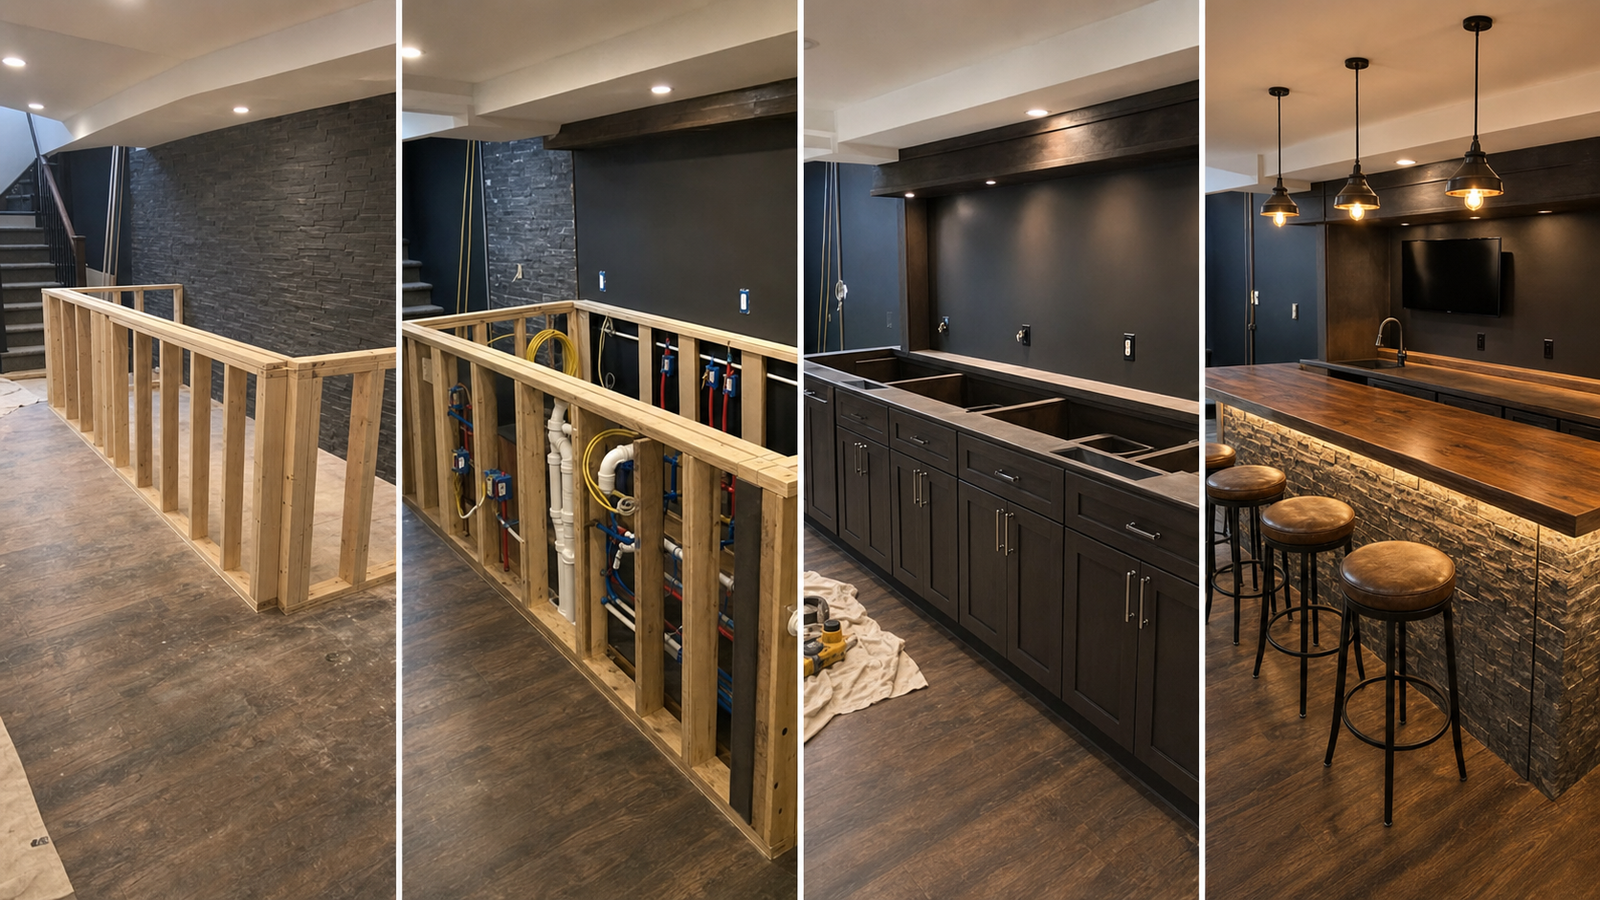
How to Build a Basement Bar: Step by Step
Here is the typical sequence for a DIY basement bar. Work in this order so plumbing and wiring are roughed in before you close up the framing.
- Confirm codes and pull permits. Check requirements before you build (see the next section).
- Prep the space. Address any moisture issues, level the floor, and mark your layout on the slab.
- Frame the bar structure. Build the base wall and front framing from dimensional lumber, checking for level and plumb.
- Rough in plumbing and electrical. For a wet bar, run supply and drain lines; for any bar, run circuits for outlets, the fridge, and lighting.
- Add the cabinets and base. Set base cabinets or build a stud-and-panel base, then secure it to the framing.
- Install the countertop. Set and seal your chosen bar top, and mount the sink if you have one.
- Finish surfaces. Add front paneling, trim, paint or stain, and a footrail if you want one.
- Wire the lighting and outlets. Connect GFCI-protected outlets and layered lighting, then schedule inspection.
- Add seating and accessories. Bring in barstools, signage, glassware, and tools to finish the room.
Because framing, waterproofing, and insulation underpin all of this, review our basement finishing ideas guide before you start the structural work.
Codes, Permits, and Safety You Cannot Skip
A DIY basement bar is part construction project, and the systems involved are exactly the ones that trigger permits. Skipping them can mean failed inspections, insurance problems, and trouble when you sell, so confirm everything with your local building department first.
When You Need a Permit
Permit rules are local, but the common triggers are consistent across most jurisdictions:
- Plumbing permit: required when adding a wet-bar sink, supply lines, or drainage.
- Electrical permit: required for new circuits, outlets, or significant wiring.
- Building permit: often required for framing and finishing previously unfinished space.
Purely cosmetic work like paint or trim is usually exempt, but a wet bar with plumbing and new circuits is not. Many areas also require radon and moisture checks before finishing a basement. Resources like Angi's basement permit overview outline the process, but your building department is the final word.
Electrical and GFCI Protection
Under the National Electrical Code (NFPA 70), basement receptacles require ground-fault circuit-interrupter (GFCI) protection, and a bar adds appliances and water that make this essential. Unless electrical work is your trade, hire a licensed electrician for the circuits and have the work inspected.
Ceiling Height and Egress
The International Residential Code (IRC), from the International Code Council, sets a minimum finished ceiling height of 7 feet for habitable basement spaces (Section R305) and requires emergency escape and rescue openings in finished basements (Section R310). Factor these in if your basement is tight on headroom or lacks an egress window.
Moisture Control
Basements are prone to dampness, and a bar adds spills and condensation. The U.S. EPA's mold and moisture guidance recommends keeping humidity low and fixing leaks quickly. Address any moisture problems before you build, not after the bar is in.
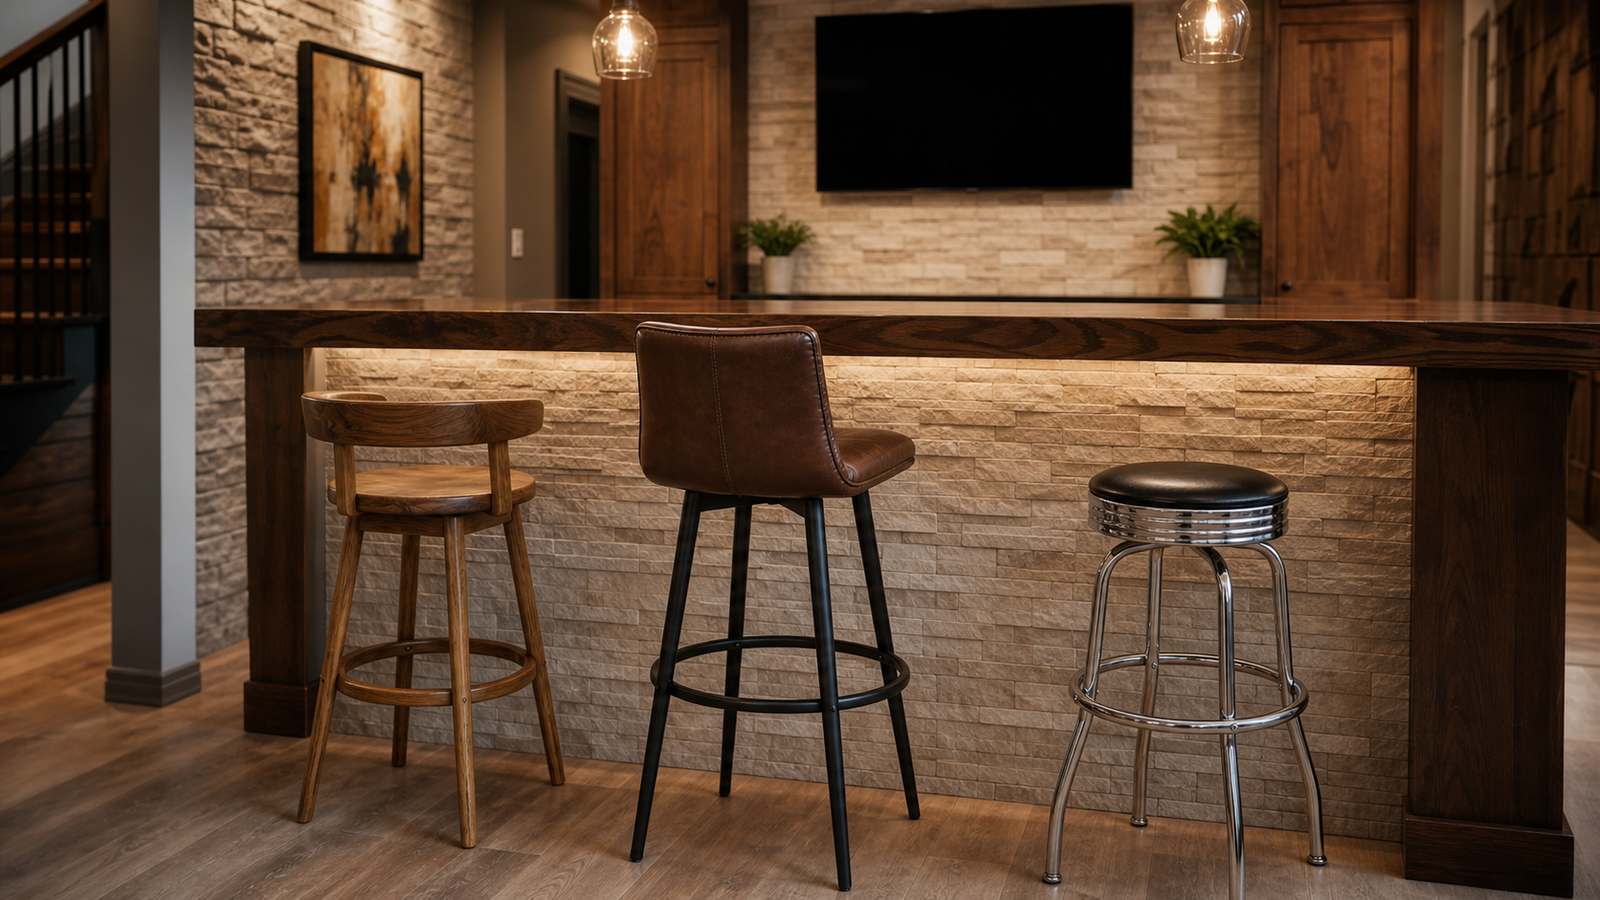
Choosing Barstools for Your Basement Bar
Seating makes the bar usable, and stool height has to match your counter. Standard barstools are about 30 inches tall and pair with a 42-inch bar top; for a more family-friendly 36-inch counter, choose counter-height stools. Materials range from wood and chrome to leather and vinyl, and stools can have low or high backs with or without cushioning.
| Counter Height | Stool Type | Seat Height | Best For |
|---|---|---|---|
| 36 in (counter) | Counter stool | 24–26 in | Family-friendly, casual bars |
| 42 in (bar) | Bar stool | 29–31 in | Classic pub-height home bars |
| 46 in+ (tall) | Extra-tall stool | 33–34 in | Raised or spectator bars |
Custom stools can be built to fit unusual needs, and you can often find great deals at restaurant-supply sales or surplus sources. For sizing and style details, see our bar stool buying guide. You can also shop a wide range at Wayfair, The Home Depot, and Lowe's.
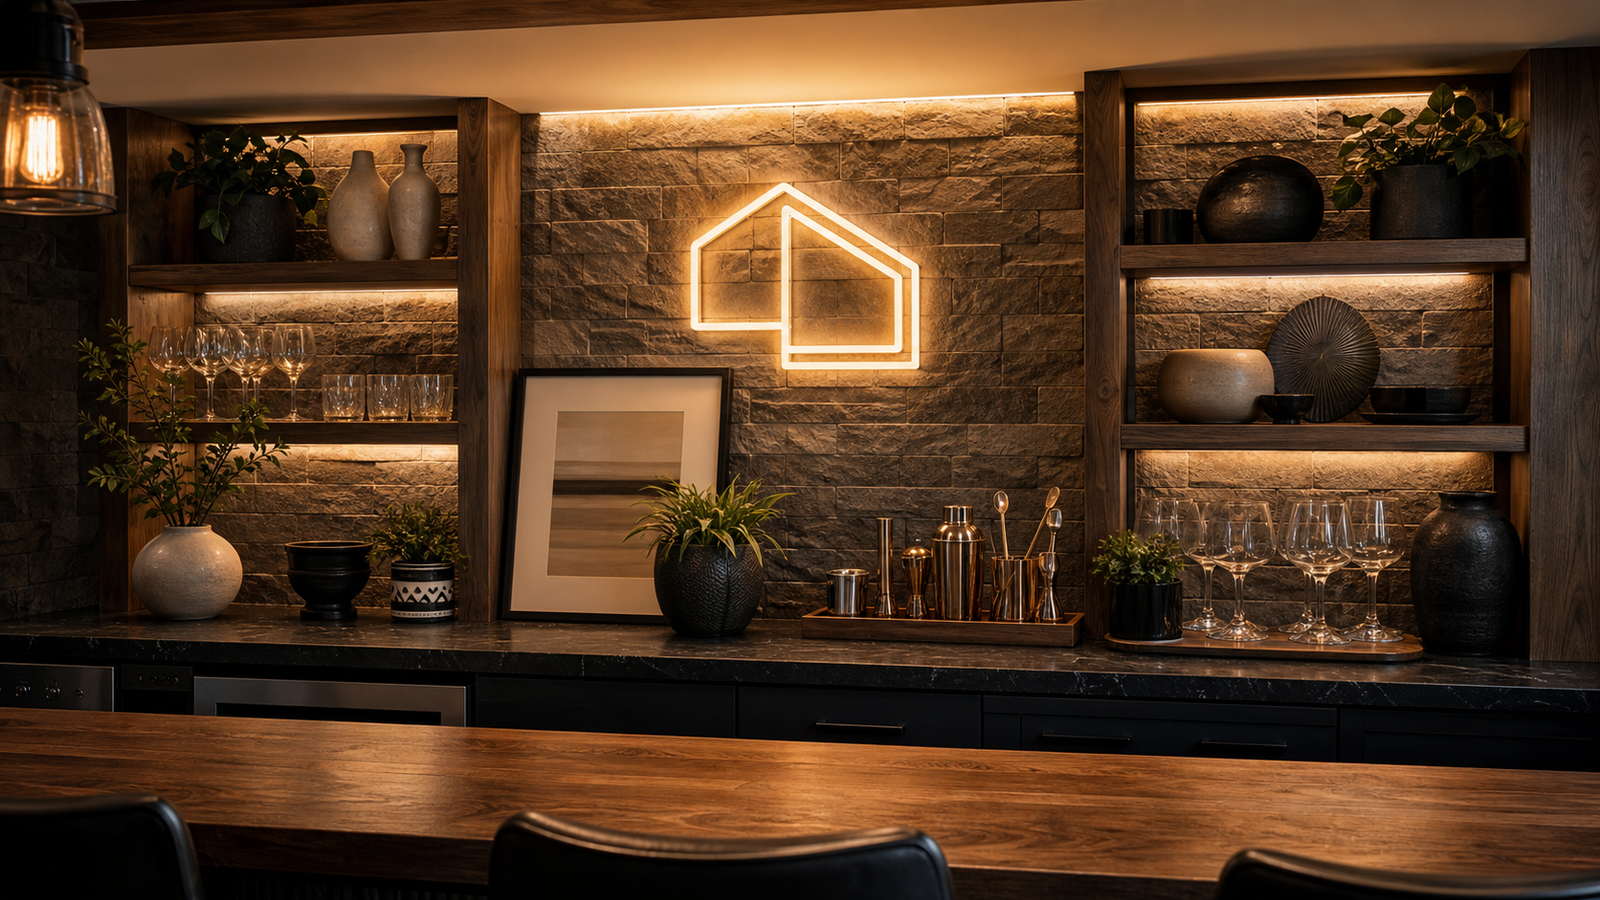
Finishing Touches and Accessories
Accessories give a basement bar its personality. The neon sign is a classic centerpiece, and modern ones are inexpensive and come in many styles — including custom signs and sports, liquor, or novelty designs. Choose a few strong accents rather than crowding every surface.
To make the bar functional from day one, stock the basic toolkit:
- Cocktail shaker, strainer, and jigger
- Martini and shot glasses, plus everyday glassware
- A blender for frozen drinks
- Bottle openers, corkscrews, and bar mats
- Mixers, garnish trays, and napkins
You can find great deals on bar accessories at restaurant-supply shops and in local classifieds. For storage and organization ideas, see our home bar storage ideas.
Bringing Your DIY Basement Bar Together
A basement bar built with your own hands is one of the most rewarding home projects you can take on. Start with a clear sketch, plan the essentials, respect the codes that apply to plumbing and electrical work, and finish with seating and accessories that suit the way you entertain. The result is a comfortable, welcoming spot you will look forward to coming home to.
Frequently Asked Questions
Is building a DIY basement bar hard?
The carpentry for a basic dry bar is manageable for a confident DIYer. The difficulty rises with a wet bar, since plumbing and new electrical circuits usually require permits and are often best left to licensed pros.
Do I need a permit to build a basement bar?
Often yes. A wet bar with a sink needs a plumbing permit, new circuits need an electrical permit, and finishing the space may need a building permit. Cosmetic-only work is usually exempt. Always confirm with your local building department.
How much does a DIY basement bar cost?
It varies widely. A simple dry bar built from stock cabinets can be a few hundred to a couple thousand dollars, while a full wet bar with plumbing, premium counters, and appliances runs several thousand or more. Building it yourself mainly saves on labor.
How tall should a DIY bar be?
Standard bar height is 42 inches, paired with roughly 30-inch barstools. A counter-height bar at 36 inches is more family-friendly and uses shorter stools. Choose the height first, then buy stools to match.
Should my basement bar be wet or dry?
A dry bar is simpler and cheaper and works well if a sink is not essential. A wet bar adds real convenience for mixing and cleanup but requires plumbing, drainage, and the permits that come with them.
Keep building with our related guides:
basement bar ideas, wet bar planning, and cabinet and countertop ideas.